bullseye tie dye method

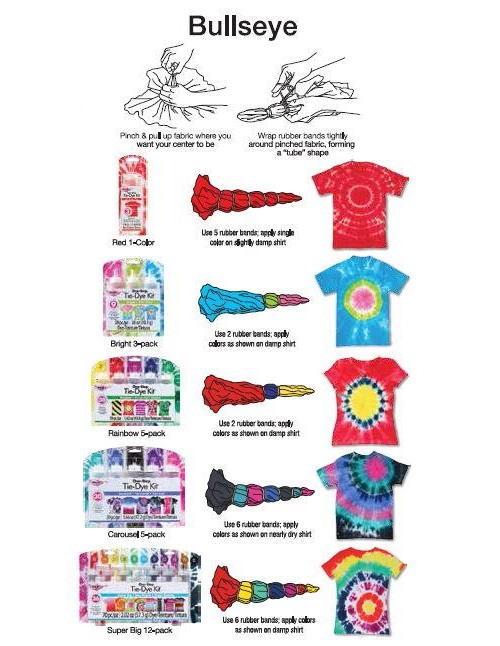
Rainbow Bullseye Tie Dye Pattern Pinch the middle of the shirt and lift up gathering the rest of the shirt. Tie-dye is a method in which you dye textiles to generate patterns.

Tie Dye Design Tutorial Video For A Bullseye Tie Dye Shirt Youtube
Bullseye Pattern for Tie Dye Shirts.

. Start with clean damp fabric and prepare dye solution as usual. Step three Once each nub has been dyed lay the item out flat and carefully apply dye to the remaining surface area. Basically what you do is tie some parts of the item of clothing together so that they dont absorb the dye.
Below are instructions for each method. Apply the dye to the fabric. From that center spot start gathering the material together evenly.
The bullseye tie dye technique is such a versatile tie dyeing pattern. Just pinch your fabric into a tube and add rubber bands to your hearts content. Fold the fabric in thirds.
We tried 2 methods. Lay the shirt flat on a table. Tie your shirts depending on the tie-dye look you are going for.
Then tie it with rubber bands spacing them evenly. Here we will tell you how to make tie-dye patterns with the easiest unique and simplest tie-dye folding methods are wandering around on the web. I used red yellow then blue.
In the video posted above you can see how this is done in the bullseye style from the way the person creating the tie-dye ties and wraps segments into the shirt with rubber bands so that the color only stains certain portions of the shirt. Bullseye Tie-Dye August 13 2021 We took the classic bullseye tie-dye technique and multiplied it across the body and sleeves to create this look perfect for a chill summer night. Tie another rubber band a little further down and make a line shape.
I Looked in the contests tab and saw the Rubber Band challenge and the first thing that came to my mind was Tie Dye. Learn the basics of this classic tie dye look. This method involves gathering and scrunching the fabric as a tube andor into a small round and tying it using a binding thread.
If youre not a fan of colors but youd still like some awesome tie-dye shirts then bleach tie-dyeing is the answer to your prayers. At this point you will have a rectangle shape. Fold the fabric in half again then fold in half once more.
This is a very basic tie and dye technique for creating uneven textured patterns on fabric. Step 2 Once you are sure the shirt rubber bands have the crumpled shirt in place place it on a rack. Pinch fabric and pull up in tube shape.
Apply one color dye to the outer folded edges then using a second color apply dye to the four corners and the. Decide where your centre is. Probably the most recognized tie-dye technique and the easiest.
Decide where you want the center of sunburst to be. Dye each section a different color in rainbow order. Bullseye Tie Dye Pattern To make a large bullseye design.
The method of tie-dying was traditionally done by hand. Bullseye Tie Dye The classic bullseye design will look great on a T-shirt pillow slip or napkin. Wrap a rubber band just below the center point then tie additional rubber bands incrementally down the fabric until you get close to the bottom.
Be sure to squeeze the colors at the rubber bands to help them blend. Locate where you want the center of your tie dye bullseye and pinch the item there. Folding You can fold the fabric into pleats and then tie and then dye.
If you want the bullseye to be off-center choose a small section off-center Pull the pinched fabric up to a point and smooth the rest of the shirt down to create a skinny cone shape. Let set 4 to 6 hours. Lay fabric flat on work surface.
Bind with rubber bands Place rubber band about 1 from the top continue banding every 2-3 along length of fabric. Corner Bullseye Tie Dye Pattern. Center your design like we did for a fun look or even place it off center for an even more one of a kind finished product.
Secure your item with rubber bands spacing them evenly around your item. Fill these squirt bottles with water all the way to the top tightly close the lid and then shake until dye is dissolved. Mix your dye according to package directions.
Pinch the fabric on that point and pull your item upward from that point to the rest of the fabric drapes down. Pinch and gather centre of fabric into a long tube. Apply dye Apply dye colors between banded sectionsCover fabric with plastic.
Pinch fabric at the center of where your bullseye will be. Pinch a piece of fabric in the center and tie it with a rubber band. Well present you with different impressive tie-dye designs and techniques below including the most famous and easiest-to-do spiral technique and crumple techniqueYou can benefit from our bullseye design tie-dye patterns in one color.
Dye each bullseye nub before dying the rest of the item. This way the dye only affects those parts that are exposed. Folded Tie Dye Technique Lay the fabric flat.
Each nub can be one color or as many colors as there are sections. Crumple the shirt into a heap and use rubber bands to prevent it from unfolding. Tie and dye as you usually do.
To create one large bullseye identify the point that you want to be the center. Wear gloves any time you are working with dye. Ensure that the shirt is dry.
Measure and mark with tailors chalk or simply eyeball it. Then bring out your bleach and ta-da. Open the tie-dye kit and select colors you want to use to tie-dye.
You have yourself a dark yet still cool tie-dye shirt. Bullseye Tie Dye Results. Pinch a small section of fabric at the center of the shirt.
Simply pick any of the popular tie-dye patterns and fold your shirt accordingly. Tie Dye Banding. Fold the fabric in half.
In this instructable I will show you some different methods o. Take each nub one at a time hold it away from the rest of the fabric and carefully apply dye. Reverse Tie Dye Technique Step 1 The process requires you to have a dark 100 cotton shirt.
You can make so many different looks from this one technique. Lay the shirt flat. Yet these days it has been adapted to machines.
It is really neat and fun to make with friends family or by yourself.

It S So Easy To Get The Bullseye Tie Dye Design Create Your Very Own Custom Shirt Using Tulip One Step Tie Dye Tie Dye Patterns Diy Tie Dye Party Tie Dye
Diy Bullseye Shirt Diy Tie Dye Shirts Tie Dye Patterns Diy Tie Dye Diy

17 Tie Dye Patterns And Folding Techniques Sarah Maker

How To Tie Dye A Shirt Bullseye Technique Youtube

Tie Dye Bullseye How To Make The Classic Tie Dye Pattern Chaotically Yours
Bullseye Tie Dye Technique From Tulip Favecrafts Com

How To Tie Dye Bullseye Pattern

How To Tie Dye Bullseye Pattern

Tie Dye Bullseye How To Make The Classic Tie Dye Pattern Chaotically Yours